As computation workloads become more data intensive, the need for keeping computing in the data center is increasing. Virtual Desktop Infrastructure (VDI) is a solution that allows a workstation experience to be hosted in a data center and accessed remotely by clients. This allows pre and post processing of the data to occur without being concerned with data migration.
In addition to easing data processing constraints, VDI also increases security by allowing all data to stay in the data center, behind a firewall. Company sensitive data no longer needs to live on every laptop and travel around the world.
In this blog post we will build a full VDI system using Red Hat Virtualization (RHV) and Scyld Cloud Workstation (SCW) from Penguin Computing. Both of these solutions are extremely robust and affordable, significantly reducing the cost when compared to traditional VDI solutions.
Overview
To create this solution, the following steps will be followed. It is assumed that you already have a functional RHV cluster.
- Ensure Network Requirements (DHCP/DNS) are met.
- Create a virtual machine in RHV and use it to create a template.
- Create the virtual machine pool.
- Configure an LDAP user group to access the virtual machine pool.
- Customize the VM Portal for easier use
Verify DHCP and DNS
Typically, in a workstation subnet, DHCP and DNS servers are configured for Dynamic DNS. Here is how that works, in detail:
- The workstation brings up its network interface and requests network information from a DHCP server. The workstations hostname (without domain) is included in this request.
DHCPDISCOVER- The DHCP server on the network will recieve this request.DHCPOFFER- The DHCP server will reply with network information including IP Address, Domain Name, Gateway, DNS Servers, etc.DHCPREQUEST- The workstation recieves the offer and then formally requests the reservation.DHCPACK- The DHCP server acknowledges the request and confirms the reservation.- The workstation will update its IP Address, FQDN, Gateway, etc using the information in the offer. The FQDN will be the workstation configured hostname appended by the domain name offered by DHCP.
Forward Map- The DHCP server will send an update to the DNS server to create the forward DNS entry (A record).- The DNS server removes conflicting records and adds this new record.
- The DNS server sends update notifications to its slave servers.
Reverse Map- The DHCP server will send an update to the DNS server to create the reverse DNS entry (PTR record in the in-addr.arpa domain).- The DNS server removes conflicting records and adds this new record.
- The DNS server sends update notifications to its slave servers.
The interaction between the DHCP and DNS server will have some layer of authentication that will vary. Typically this is either a preshared TSIG key or a Kerberos ticket. The updates allowed by the DNS server can also be granularly controlled. All of that is outside the scope of this post.
Because these VDI virtual machines are, functionally, workstations, they should be placed on a workstation network. This solution will focus on providing an infrastructure that depends on DHCP and Dynamic DNS. For the best solution, it is good to dedicate a subnet and subdomain to your VDI workstations. This allows you to easily have signed certificates for HTTPS traffic. In my network, I have designated a /24 subnet to Scyld Cloud Workstation. The domain for my network is lab.rmkra.us. For Scyld Cloud Workstation machine, I put them in the domain scw.lab.rmkra.us. The DCHP server for the SCW subnet offers the proper domain and is configured to send updates for that domain.
Create a Baseline VM and Generate a Template
Create Baseline VM
Using whatever standard procedure you typically use, create a new RHEL 7 virtual machine. Configure this virtual machine the way you would configure a workstation. Be sure to install the GNOME packages.
Since no first boot system initialization will be required, it is best to remove the firstboot and gnome-initial-setup packages.
# yum remove -y firstboot gnome-initial-setup
For a better VDI workflow, you’ll likely want virtual machines to be released back to the pool when a user logs out of the virtual machine. That is not the default behavior, but we can achieve this by having the virtual machine shutdown when a Gnome session ends. This can be done by putting a small script in the file /etc/gdm/PostSession/Default.
# ll /etc/gdm/PostSession/Default
-rwxr-xr-x. 1 root root 149 Dec 18 10:59 /etc/gdm/PostSession/Default

# cat /etc/gdm/PostSession/Default
#!/bin/sh

function stop() {
        /usr/bin/sleep 10
        /usr/sbin/shutdown -h now
}

export -f stop
/usr/bin/nohup /bin/bash -c stop &> /dev/null &

exit 0
To improve the overall RHV experience, ensure the guest agent is installed.
# yum install -y ovirt-guest-agent
Baseline VM Networking
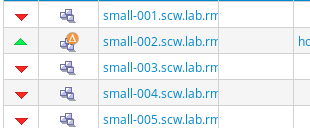
As discussed, these machines will use DHCP to join the network and announce their hostname. The tricky part to this is that all of our VMs will start with the same hostname configured because they are all clones of the same image. This is definitely not ideal. What we need is a way for each VM to generate a known unique hostname before joining the network. To do this, we create a systemd service that runs a script to set the hostname. We use the VM’s RHV ID as a seed to generate a string that we know to be unique very quickly. The following two files are required to set this up.
# ll /etc/systemd/system/random-hostname.service
-rw-r--r--. 1 root root 229 Dec 19 16:15 /etc/systemd/system/random-hostname.service

# cat /etc/systemd/system/random-hostname.service
[Unit]
Description=Generate a unique hostname on boot
Wants=Basic.target
Before=network-online.target,network.service

[Service]
Type=oneshot
ExecStart=/usr/local/sbin/random_hostname.sh

[Install]
WantedBy=network-online.target
# ll /usr/local/sbin/random_hostname.sh
-rwx------. 1 root root 902 Dec 19 16:09 /usr/local/sbin/random_hostname.sh

# cat /usr/local/sbin/random_hostname.sh
#!/bin/bash

idx=0
loop=1
host_prefix="rhel-"
host_suffix=""

while [[ $loop == 1 ]]; do
	# calculate hostname
	if [[ $idx == 0 ]]; then
		key=$(/sbin/dmidecode -s system-uuid | /bin/awk -F- '{ print $1 }')
	elif [[ $idx == 1 ]]; then
		key=$(/sbin/dmidecode -s system-uuid | /bin/awk -F- '{ print $2 $3 }')
	elif [[ $idx == 2 ]]; then
		key=$(/sbin/dmidecode -s system-uuid | /bin/awk -F- '{ print $5 }')
	elif [[ $idx == 3 ]]; then
		key=$(/sbin/dmidecode -s system-uuid | /bin/awk -F- '{ print $2 $3 $4 }')
	else
		key=$(/sbin/dmidecode -s system-uuid | /bin/awk -F- '{ print $1 $2 $3 $4 $5 }')
		loop=0
	fi
	name="${host_prefix}${key}${host_suffix}"

	# change hostname
	if ! ( /bin/ping -c 1 "${name}" &> /dev/null ); then
		loop=0
		/bin/hostnamectl set-hostname "${name}"
		echo "Set hostname to ${name}"
		exit 0
	fi

	# no joy, increment index
	idx=$(( $idx + 1 ))
done

exit 1
Then you can enable this new service.
systemctl enable random-hostname
Ensure the network interface uses DHCP to boot. Ensure that ipv4.dhcp-send-hostname is set to yes to ensure the hostname will be reported to the DHCP servers.
# nmcli con sh 'System eth0'
...
ipv4.method:                            auto
ipv4.dns:                               --
ipv4.dns-search:                        --
ipv4.dns-options:                       ""
ipv4.dns-priority:                      0
ipv4.addresses:                         --
ipv4.gateway:                           --
ipv4.routes:                            --
ipv4.route-metric:                      -1
ipv4.route-table:                       0 (unspec)
ipv4.routing-rules:                     --
ipv4.ignore-auto-routes:                no
ipv4.ignore-auto-dns:                   no
ipv4.dhcp-client-id:                    --
ipv4.dhcp-timeout:                      0 (default)
ipv4.dhcp-send-hostname:                yes
ipv4.dhcp-hostname:                     --
ipv4.dhcp-fqdn:                         --
ipv4.never-default:                     no
ipv4.may-fail:                          yes
ipv4.dad-timeout:                       -1 (default)
...
Install Scyld Cloud Workstation
Obtain the SCW server RPM for el7 from Penguin Computing along with your license. Install the SCW rpm on your template VM and configure your license/license server per the instructions provided by Penguin.
The SCW server configuration can be found at /opt/scyld-cloud-workstation/sycld-cloud-workstation.xml. In this file, you’ll want to enable OS Authentication. It is also useful to limit video bitrates and redirect the HTTP port for a better overall experience.
Below is the configuration used for this documentation.
# cat /opt/scyld-cloud-workstation/scyld-cloud-workstation.xml
<config>
  <Server>
    <RedirectHTTPPort>true</RedirectHTTPPort>
    <Auth>
      <OSAuthEnabled>true</OSAuthEnabled>
      <Username>admin</Username>
      <ShadowPassword>REDACTED</ShadowPassword>
      <MinPasswordLength>12</MinPasswordLength>
    </Auth>
    <Video>
      <IntraRefresh>false</IntraRefresh>
      <AvgBitRate>1280x720=5000k,1920x1080=10000k</AvgBitRate>
    </Video>
  </Server>
  <openSSL>
    <server>
      <privateKeyFile>signedKey.pem</privateKeyFile>
      <certificateFile>signedCert.pem</certificateFile>
      <requireTLSv1_2>true</requireTLSv1_2>
    </server>
  </openSSL>
</config>
You’ll need to open ports for HTTP and HTTPS traffic through the system firewall.
firewall-cmd --add-service http
firewall-cmd --add-service https
firewall-cmd --add-service http --permanent
firewall-cmd --add-service https --permanent
Finally, make sure the scyld-cloud-workstation service is running/enabled.
systemctl enable scyld-cloud-workstation --now
SSL Certificates
For a production deployment, signed SSL certificates should be used for Scyld Cloud Workstation. This is slightly difficult since all of the virtual machines will be identical, but have different hostnames. The easiest way to handle this is to group all the SCW machines into a dedicated subdomain. A wildcard SSL cert can then be generated for this subdomain and loaded onto the virtual machines. Using a dedicated subdomain substantially reduces the threat possible if this certificate were to leak. The SCW configuration from the previous step points to these signed certificate files.
In this example, I will be creating virtual machines with hostnames like rhel-xxxxxx.scw.lab.rmkra.us. For this I have generated an SSL certificate that is valid for *.scw.lab.rmkra.us. None of my lab services are hosted on this subdomain. If this certificate were leaked, it could not be used to masquerade as an official lab service.
Ensure your signed certs only allow read/write from root.
chmod 0600 signedKey.pem signedCert.pem
chown root:root signedKey.pem signedCert.pem
Persistent Storage
Once the virtual machine pool is created, all of the VMs will be entirely ephemeral. That means you’ll need remote drives mounted for persistent storage. Chances are, you already have a standard set of drives that your enterprise mounts. My recomendation is to, at a minimum, mount remove home directories (/home) and mount an additional target for general data/project purposes (something like /data).
High Availability
Make sure that VM High Availability is turned off in RHV. This is done by editing the VM record in the RHV management interface. High Availability does not work on stateless virtual machines and is not a good model for managing ephemeral desktops like this.
System Icon
On the Icon tab in the virtual machines properties, upload an icon to represent this machine. This is not required, but it makes a big difference with user experience. I like to use the following icon for SCW.

Create Template
Once the workstation image has been created to your satisfaction, shut it down. Log into the RHV Virtualization Manager and navigate to Compute -> Virtual Machines. Select the template VM from the list, and click the expand menu ellipses in the top right of the view. Click the Make Template button. Give the template an appropriate name and check the Seal Template option. Sealing the template will, among other things, remove the Root user’s SSH keys and remove any Red Hat entitlements.
Create a Virtual Machine Pool
Now that a template exists, we can create our VM Pool. The Pool is what will handle most of the management and all of the scheduling of our VDI machines. When an end user would like a VDI session, they will request a VM from the pool. One of the VMs in the pool will be scheduled to them. When that VM is shutdown, it will be returned to the pool and restored to its starting point.
To create the pool, in the RHV mangement interface, navigate to Compute -> Pools. Click the New button at the top right of the view.
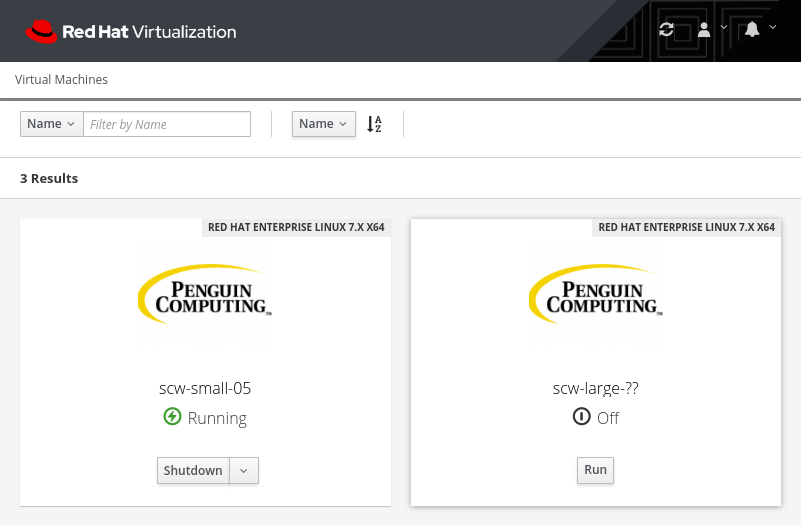
In the General tab, ensure the correct template is selected. Also make sure that Optimized for is set to Desktop. In the name field, input a formatting string that will be used to generate the VM names. I’ll be using the string scw-small-??. This will create names like scw-small-01. You can populate a description and comment if you wish. Set the Number of VMs to the total number of virtual machines you would like to be available in this pool. Set Prestarted VMs to zero for the time being. We will increase that later. Set Maximum number of VMs per user to one for now. You can alter this number based on your bussiness needs. Do not check Delete Protection.
A quick aside about the VM name. This name is not the same as the VM’s hostname. Think of this name more like an instance type name that you might see in a cloud provider.
On the System tab, ensure the memory and CPU values are set to your liking. Note, it is possible to have a few VM Pools with different VM sizes that all refer to the same VM template. You can use this to offer t-shirt sizes: small, medium, large.
On the Type tab, make sure the Pool Type is Automatic and that Stateful Pool is not checked. This allows VMs to be returned to the pool when shutdown and rewinds changes before putting back into the pool.
On Initial Run, make sure Use Cloud-Init/Sysprep is not checked. In this documentation, we have not used Cloud Init to setup our machines. Instead we have used DHCP, DNS, and the custom-hostname service.
On the Boot Options tab, ensure the first boot device is the Hard Disk. You do not need a second boot device.
Verify all your settings before clicking OK. Most of these options cannot be changed once the pool is created. After creation, you can scale the number of vms and change the number of prestarted vms, but most other options become locked.
When you are happy with your selections, click OK. Once you do, you’ll notice RHV start to create all of the pool VMs in the Compute -> Virtual Machines view. Wait for them to finish creating.
Prestart VMs
You should now be ready to begin powering on your Pool VMs. Navigate to Compute -> Pools and edit the pool you just created. Change the Prestarted VMs to any number greater than zero. The virtual machines will take a minute or two to start up and having some prestarted will greatly improve customer experience. However, starting up too many can result in wasted resources. Find the right balance for you to meet customer demand without wasting resources. For now, you can set this to one and increase it later if needed.
RHV will now begin launching a VM. Depending, mostly, on the speed of your backend storage, this will take a minute or two because RHV has to take snapshots of the VM before starting it.
Configure RBAC
Your RHV cluster should already be configured to authenticate against a central LDAP server like AD or Red Hat IdM. The ideal scenario would be to use LDAP groups to control user access to this virtual machine pool. You could create multiple groups that can access the different t-shirt sizes. I wont cover that in detail, but it is just a repitition of the same process.
First, create your group in LDAP. I will be using a group named scw. Any user in the scw group will be given access to this resource. Once the group is in LDAP, you’ll add it to RHV. Go to Administration -> Users and click the Add button. Select the Group radio button, set Search to your LDAP auth domain, and search for your group. If the group is found, it should appear in the selection box. Select your group and click Add and Close.
To grant this new group access to the virtual machine pool, navigate to Compute -> Pools. Select your new VM pool from the view and go to the Permissions tab. Click the Add button at the top right of this view. Select My Groups radio button at the top and select your group from the selection window. Ensure that Role to Assign is set to UserRole then hit OK.
Customize VM Portal
Most everything is setup and ready to go. However, there will be one small annoyance for your users of this system. The virtual machine portal will, depending on the webpage width, ellipsize the virtual machine’s FQDN rather than displaying the full FQDN. This behavior can be easily disabled.
On the machine hosting the RHV Manager, edit the file at /etc/ovirt-engine/branding/50-rhv-2.brand/rhv.css and add the following CSS to the end of the file.
div#vmdetail-details-fqdn {
    max-width: unset !important;
}
Save and quit the file.
Profit
Your VDI solution should now be up and running! Log in to RHV as a non-privileged user in the SCW group and go to the VM Portal. You should see the pool as available. Clicking Run will produce an avilable virtual machine. You can then click on the virtual machine to see its hostname. That hostname can be used in the SCW client or put directly into the browser for the in-browser viewer. Note: The RHV console options are also available for connecting to the machine. There is no need to use these as SCW will provide much better performance than Spice or VNC. Make sure you do not confuse those options for SCW!
Cluster and Pool Patching
Patching ease is one of the great benefits of ephemeral VM pools. Instead of patching and verifying each machine/workstation seperately, patching only needs to be completed once.
Cluster Patching
The RHV cluster may continue to be patched and managed as it was before. CPU based SCW instances can be safely migrated between hosts. The only special consideration needs to be for GPU/vGPU enabled virutal machines. We don’t cover GPU enabvled nodes in this post, but if a VM is tied to a GPU/vGPU, it cannot be migrated. These should be shutdown before patching begins or the hypervisors will fail to move into maintenance mode.
Pool Patching
To patch the virtual machines in the pool, first power on the VM used to generate the template. Connect to this machine and make any necessary configuration or software updates. Once these changes are complete, shutdown the VM and use the Make Template button to publish a new version.
In about the middle of the New Template form, there is a check box labled Create as a Template Sub-Version, check this box. Select the appropriate root template and then give this new version a name. I like to use a naming convention that is YYMMDDXX where x is simply a counter starting at one everday. So I may create a new version labeled 19121801 which means that it is the first version I created on December 18, 2019. Check the Seal Template box and select OK. This will start the template creation process.
Now you need to edit the Pool to reference the new template version. Go to Compute -> Pools and edit the desired pool. In the General tab, change the Template field to point to the newest version you published and click OK.
At this point, anytime a VM is created, it will be created with the newest image. However, any running VMs will not be updated. This includes preallocated VMs. To force an update to these machines, they must be shutdown. You can either allow users to shutdown their instances at their own convenience or you can initiate a shutdown from the RHV Manager. Any hosts that have not been restarted since the change will show a pending change notification in the manager.
Offline the Pool
There may be instances where you would like to turn off access to the VM Pool. Possibly for large maintenance windows where you do not want users to access the environment unknowingly. Taking a VM Pool offline is actually very trivial. Simply remove the LDAP group from the Permissions page of the Pool and shutdown any running machines. When your maintenance window is over, simply add the LDAP group back to the pool.
Backup and Recovery Considerations
A great benefit of using an ephemeral infrastructure like this is backup and disaster recovery is very cost effective. You no longer are expected to recover many highly individualized machines. So long as you can recreate the base image, you can recover. The disk image of the virtual machine used to create the template can be exported as an OVA and saved in long term storage. It is also possible to use Ansible to create the source virtual machine. Then, as long as your Ansible code is backed up, you can still recreate the environment.